Do a creative project every day for four straight days.
Projects must be completed in a day, so they need to be as compact as they are creative
Each project needs a name and documentation posted by the end of the day. Each should be a stand-alone accomplishment
4×4 Day 1: EarthTainer
By Matthew Rader on Day 1, January 2011
Growing up in farmtown Ohio I was completely spoiled by having plenty of wide open space to garden in. I remember meticulously planning my gardens on graph paper all winter waiting for that last frost to start a new growing season. When I moved to the city I had to give all that up but last summer I started a rooftop garden with my partner Pamela. We had two 4×4′ raised beds and grew everything from tomatos and peppers to corn, carrots, and pumpkins. It was more an experiment and a hobby than anything that provided any serious sustenance.

Rooftop gardening brings with it many untraditional variables. Temperatures are much higher on shiny rooftops which leads to high evaporation rates and even leaf scorching. The other destructive problem is wind. 50-75mph gusts during summer storms are not uncommon and can be disastrous. During the Brooklyn tornadoes last summer the winds were so strong that most of our epic tomato plants branches were snapped like twigs even after being heavily secured. Regardless of the challenges it was still fun and seemed to light a fire under me fueled by nostalgia and a green thumb.
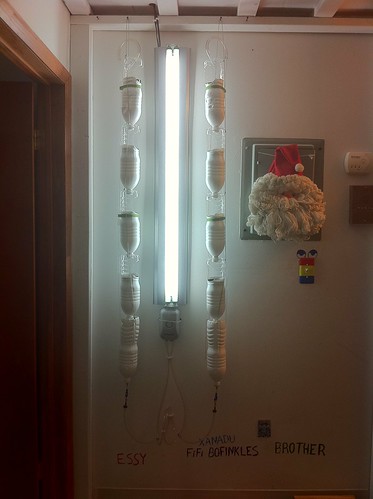
This winter, while waiting for the spring to come, we set up a hydroponic WindowFarm. We are using complete artificial light with a 4ft T8 fluorescent strip light with 6500k bulbs.
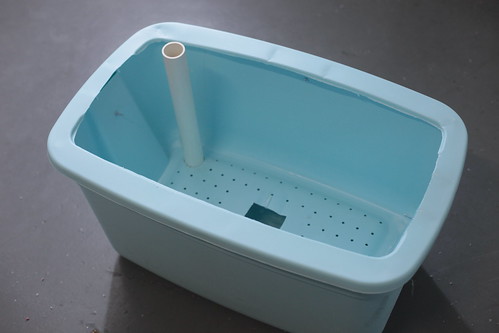
It’s only January but it’s about time to start seedlings for spring and to think about garden plans for this year. We’ve decided that we are going to try out SIP (sub-irrigated platers) gardening. Essentially what you are doing it creating a container garden from rubbermaid totes. There is a reservoir of water in the bottom of the tote that you fill by a pipe that sticks above the soil line. Water is drawn up from the reservoir by a wicking capillary action. The advantages of SIP gardening are water conservation through less evaporation – perfect for rooftop gardening. Brooklyn’s own Bob Hyland has been an inspiration for this project along with GlobalBuckets. For this project I am following the instructions put together by EarthTainer. They have an awesome tutorial on how to build your own that is infinitely more detailed than what I’m going to show you below. Here are a few pics of my process:
Purchased:
Two 30 gallon totes, 1.5″ PVC pipe, Smaller tupperware container, various screws.
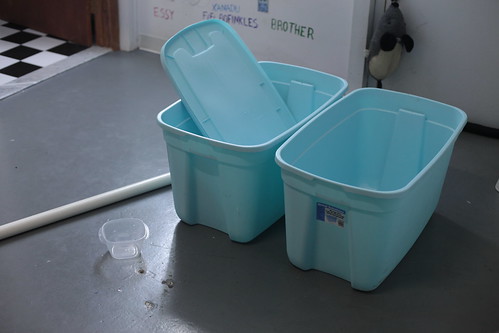
First I measured and cut off the top of one tote per EarthTainer instructions with my handy dandy dremel.
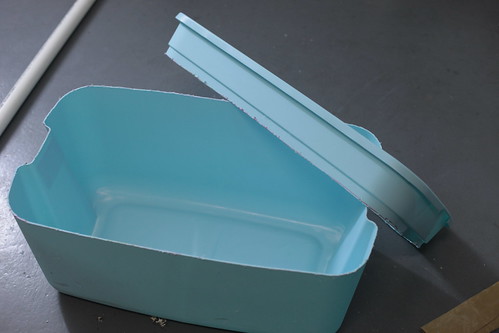
I cut up the top of the tote I just decapitated to make a base for support. This will make sense once we drill holes on the interior tote and secure in inside the other.
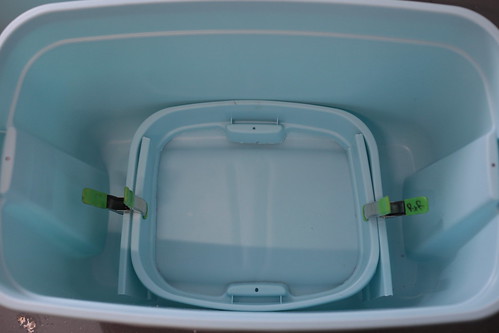
This is a wicking basket that I made from a plastic tupperware container. The wicking basket is going to connect the water reservoir to the rest of the dirt in the SIP. Through capillary action the dirt in the wicking basket wicks up water. I drilled it with a bunch of holes to let water in to the potting mix.
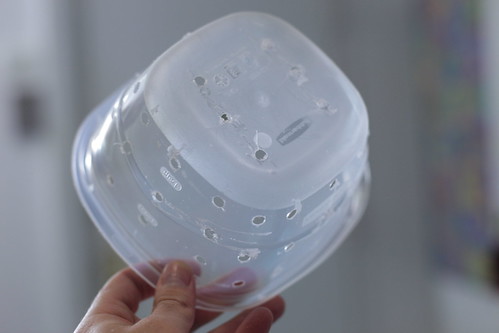
This is essentially the finished EarthTainer complete with filling water pipe. The initial tote we cut up goes inside of the other tote and sits on the base we made. The wicking basket is tied with zip ties to the bottom of the interior tote and a bunch of holes are drilled for aeration. All that is needed is potting mix in the spring and plants. <3
Construction of your SIP isn’t an exact science and there is no “official way”. If you want a commercial product, check out EarthBoxes. Going forward I think that I’m going to try converting last year’s 4×4′ raised bed’s with corrugated pipe into SIP plots. People get real creative using all kinds of materials and create SIP’s out of everything from buckets and recycled milk bottles to actual cloth tote bags. If you like gardening, you don’t have to give it up just because you live in a city. Please do a little googling if you are interested in EarthTainers. Other people have put together much better guides than I could. :)
<3 rader
Add comment | January 18th, 2011
Flickr API – photo portfolio
By Jeff Howard on January 2011
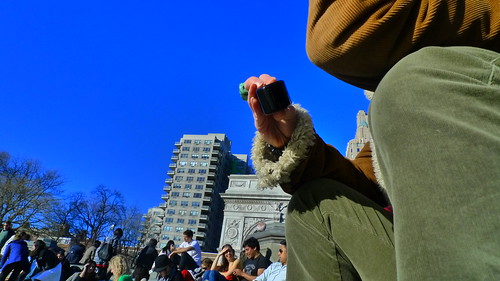
For day one I figured I’d get started on two things I’ve been wanting to spend more time on. One being to spend more time with the Flickr API. The other to start work on building a photography portfolio. I figured I wasn’t really into the idea of a polished professional looking portfolio with just a select number of photos. Instead I wanted something a bit more dynamic and unusual. There comes in the Flickr API. What I particularly like about using Flickr is that I don’t have to worry about updating the portfolio, I can just update Flickr and the changes will take effect (especially nice with all the iPhone camera apps that have Flickr integration these days).
The initial plan was just to get something up and running and start implementing and thinking up new things to add as the day went on. I’ve been looking at this as a project that will be bigger than a day’s work but figured a strong start will make me more likely to get it done. He’s where I’ve got so far …
I setup phpFlickr to make the use of the Flickr API a little easier. I then started pulling in images and formatting them into a grid. Next was implementing Lightbox for viewing the larger images. From there I brought in a nav and created some other example API calls to pull images in a few different ways. Here is what it looks like now …
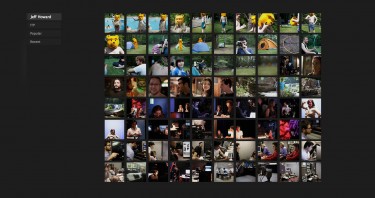
( click the image to take you to the site )
As far as next steps go, I’ve still got plenty of work ahead of me. Need to get my Flickr account up to date with the backlog of photos I’ve been meaning to edit. I’ve been working on that over the past week though, so I’ll be getting them uploaded over the next few days. Once I’ve got that done I need to do some reorganizing and restructure the nav to make some calls that make a bit more sense for a photography portfolio. I also want to integrate some more interesting calls in there too. I’d like to tap into other APIs so that I can do things like pull images that have tags or geolocation data associated with my Foursquare or Twitter updates. Again, I like the idea of finding ways to add a twist that I don’t have to actively be logging in to update. So I’ll be exploring those ideas more. First off though, I’ll likely try to get some smaller more practical things out of the way. Things like adding a Flickr icon in the Lightbox descriptions that will allow users to click through the image’s Flickr page, adding pages to navigate to additional images in the grid, integrating AJAX so the pages don’t have to reload and adding a search field to the nav. But before any of that … on to day two!
Add comment | January 18th, 2011
4×4: PreGame
By Matthew Rader on January 2011
Warming up for the Winter 4×4 with a little Sunday pregame action. Shooting a music video for “Twin Shadow” as Reed + Rader on Wednesday and need to make a cutout body/armor prop. Without detailing too much, here it is…
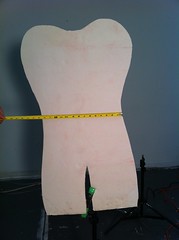
Measured the initial hand drawn mockup that was cut from foamcore:
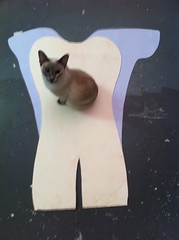
Mocked up the final designed cutout in Photoshop and then printed it out and taped together a stencil (Xanadu the Cat teleported in from Mister Jenning’s closet):
Final cutout armor prop cut from 1/2? foamcore to be used at the shoot on Wednesday:

I really wish the client would have signed off on making the cutout in 3D. In the past we have made this in 3D like the Andross mask below…
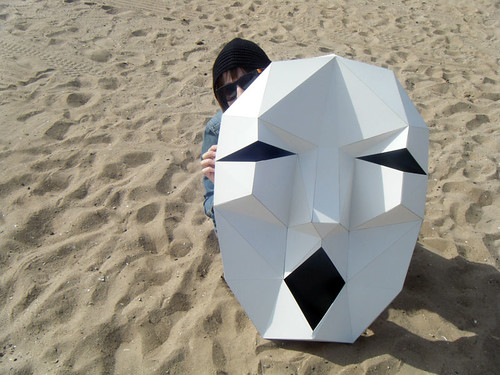
…using our very basic modelling skills in Blender and using Pepakura Designer to unwrap the 3D object into 2D so it could be printed out, traced onto matboard, and folded back into a real life 3D shape. Ah wells…
<3 r a d e r
Add comment | January 18th, 2011
666 tribulations, lather, rinse, repeat
By yuditskaya on Day 4, March 2010
cut up tribulations 99 by Craig Baldwin,
shuffle, and play.
simple play and repeat
result:

and video here:
[http://www.vimeo.com/10252368]
Add comment | March 18th, 2010
GOST
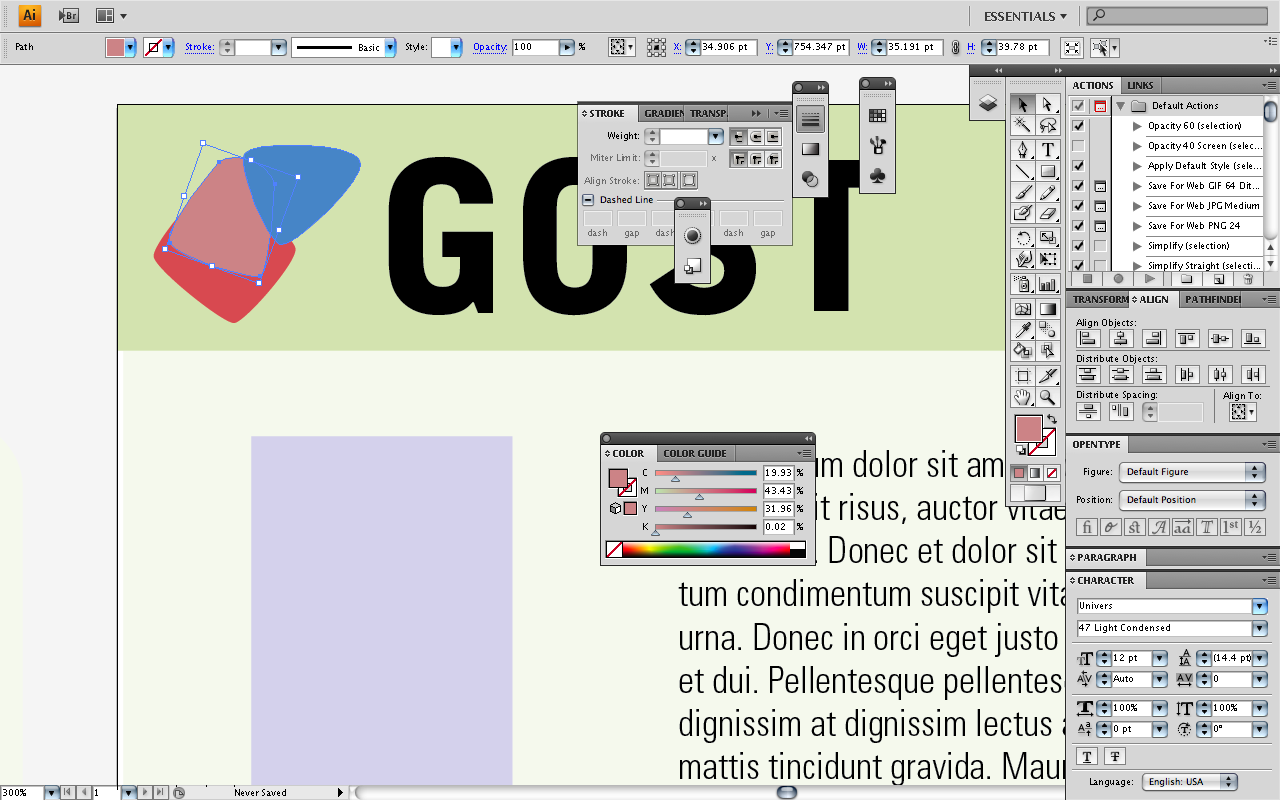
By yuditskaya on Day 3, March 2010
The Global Organization for the Socialization of post-Turing-complete-entities
working on logo:
and web site:
http://www.sofyyuditskaya.com/sonia/wp-content/uploads/2010/03/Picture-24.png
so goes the groundwork.
Add comment | March 18th, 2010
Linkages: Drag-Link Mechanism
By Morgen Fleisig on Day 4, March 2010
I had considered posting about The Battle of Brooklyn again.  I finally signed up to Skype and made my first call through my laptop to São Paulo: it was like using the telephone for the first time.  Pretty amazing.
Anyway, I got over that and Julio and I spent over an hour working out the game mechanics for our Come Out and Play submission. Â Then I marched off through the Gowanus Canal to Stone House to take some pictures and do some research on the ground. Â We’ve got a little ways to go on that, though, so I think I’ll hold off. Â Suffice it to say that there’s not a lot left of the American Revolution in that section of Brooklyn. Â It goes back pretty much as far as the Civil War:
And Stone House was rebuilt during the WPA:
Anyway, I decided to work on linkages some more, and moved on to the Drag-Link Mechanism. Â As described by Marks’ Mechanical Engineers’ Handbook, it is a 4-bar linkage with the short side fixed, “used to feather the floats on paddle wheels.”
I constructed it first by eye from the diagram and got this:
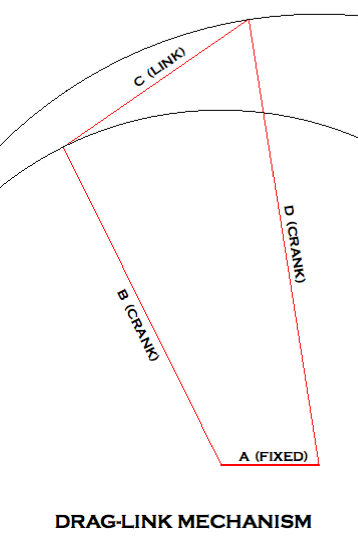
And animated it here: Drag-Link Mechanism (preliminary).
Unsure what earthly purpose that could have, I googled paddle wheel floats, and came up with Buchanan’s Parallel Float Wheel:
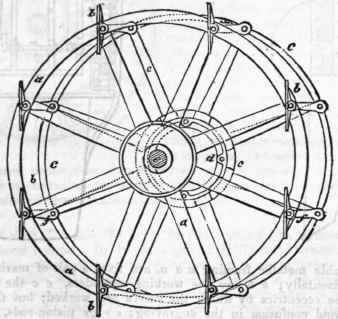
All clear, I redrew the mechanism to achieve a feathered paddle.  I imagine something like this could be used for all sorts of things, say keeping Ferris Wheel seats from pitching out their passengers.  Fascinating as well are the variations on this wheel that control the pitch of the paddle.  Feathering a paddle as you steer a canoe is practically an art, and it is remarkable that a mechanism had been developed to achieve this for a side-wheeler:
I’m very excited about this. Â Despite the fact that technology has moved on to the point of rendering much utterly obsolete, there is always something to learn from old inventions. Â Patent archaeology is invaluable even if it only helps to clarify a principle.
Add comment | March 17th, 2010
Wood Sculptures
By Mike Cohen on Day 4, March 2010
Originally for Day 4, I planned on making a single wood sculpture with whatever scrap wood we had in the shop. I thought I’d make something sort of symmetrical with small blocks. After completing the sculpture, I decided that I couldn’t stay away from technology and that making just one sculpture wasn’t enough. Inspired a bit by the Nobody Beats the Drum video for Grindin’, I decided to make a stop motion video disassembling and assembling sculptures. Being that everything I’ve done for 4-in-4 has been new to me, I figured I’d add stop motion to my skillset.
So here it is.
Add comment | March 16th, 2010
Atari ET Cartridge 3D Model: my first Blender project
By Greg Borenstein on Day 3, March 2010
For day 3 of the 4-in-4, I made a Blender model of an Atari cartridge, specifically, “ET: The Extra-Terrestrial” from 1983. This model is the first step on a large project I’m undertaking: a diorama depicting a hoard of millions of ET cartridges buried in a dump outside of Alamogordo, NM.
When Atari undertook the design of the game, they expected wild commercial success. The whirlwind development process was designed to capitalize on the incredible popularity of Steven Spielberg’s movie. Unfortunately, it also lead to an extremely poor level of quality in the final game, which was boring, confusing, and featured abominable graphics:
The result was millions of unsold cartridges that the company had no way to dispose of. Eventually, the hit on the solution of burying the cartridges in a dump outside of Alamogordo, New Mexico.
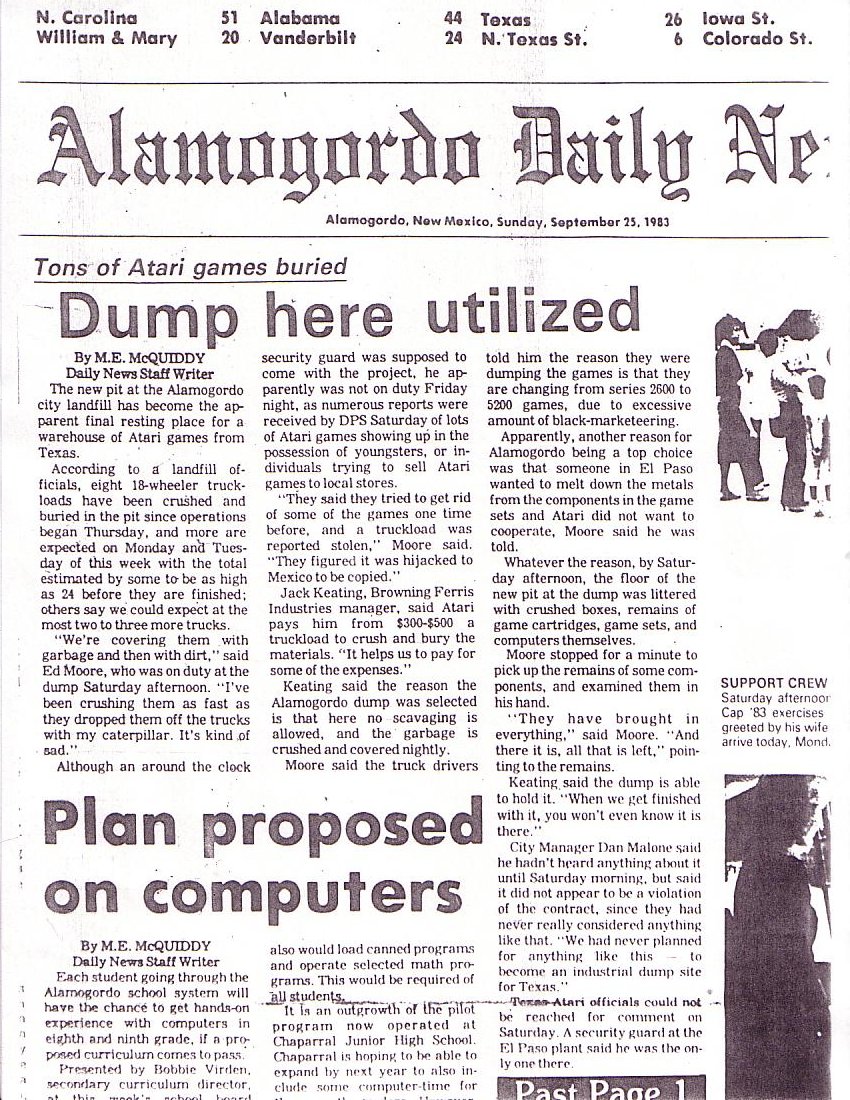
I first heard of the dumping from Nick Montfort’s excellent history of the Atari 2600 Racing the Beam. For more on the topic, see the Wikipedia and Snopes articles on the topic.
This 3D modeling project is the first step towards building a diorama depicting the full dump with millions of cartridges, the concrete slab that covers it, and the New Mexico dessert and sunset above.
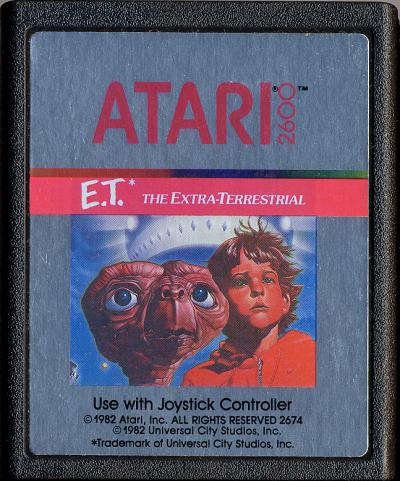
To start out, I searched out high quality scans of the Atari cartridge online. I ended up finding them on Atari Age. Here, for example, is the front of the cartridge:
I used these high resolution scans and some other research to figure out the dimensions of the cartridge and set about building a basic rectangular solid that matched these dimensions.
I used Blender as my 3D modeling tool of choice on the recommendation of Scott Wayne Indiana. With lots of help from Scott, I managed to get going with the basics in Blender and, eventually, I had a rectangular solid with the right proportions:

(Note, both Scott and I found Super3boy‘s Blender tutorials to be incredibly useful in the process of getting started with this complicated program. It’s both humbling and really helpful to learn by listening to a bunch of tutorials narrated by a kid who sounds like he’s about 7.)
After I had that down, I started working on adding the cutaways for the stickers on the top and front. Using Blender’s “add difference marker” functionality, I was able to use separate rectangles to carve those out from the original slab. Then, finally, I added a bevel to the edge of the cartridge to simulate the roundness of the original:

Writing down this process in a few simple sentences makes it sound linear and straightforward. It was actually difficult and somewhat challenging. Without Scott’s help, the entire endeavor would have taken significantly longer.
Once I had the basic shape of the cartridge worked out, it was time to try to add the graphic stickers to the top and side. After an initial attempt to navigate Blender’s nest of menus (aided by this tutorial on textures in Blender) I eventually managed to map the image all over my entire object:

This was not quite what I wanted, but it was exciting to see an image actually appear for the first time. Eventually, I found the Blender wiki tutorial on multiple materials which explained how I could apply an image to just one specific surface of my object. This also made the Blender menu system start to make sense to me for the first time (by explaining the way selections made in certain menus modified the options available to you in others.) The result was a cartridge that was really starting to look right:
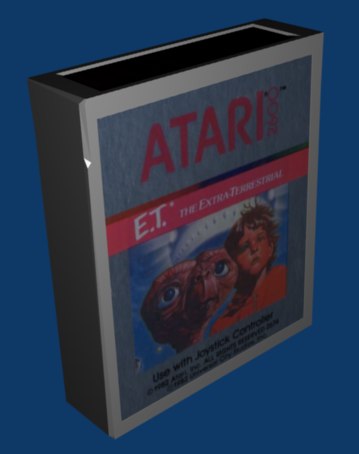
The end cap should have the ET logo image on it — which isn’t working for some reason I don’t understand — but otherwise this is really starting to be what I was aiming for. I even added an additional gnarled black texture to emulate the molded plastic of the non-sticker part of the cartridge. I’ll probably include that texture in the final print, but I’m not showing it here because it made it very hard to see the details of my 3D modeling in Blender’s preview images.
There are two next steps forward for me on this project. One of them is to get a 3D print made of this cartridge, mainly to gain experience with 3D printing. The second step is to make a model of the ET box and start combining multiples of that box and this cartridge into the limitless pile that sits under the Alamogordo sand.
1 comment | March 16th, 2010
picture perfect
By jelani on Day 4, March 2010
It was so nice today, I decided to take a walk and take some pictures. The best of reside here on flickr
Here’s a sampling.


Add comment | March 16th, 2010
The Battle of Brooklyn
By Morgen Fleisig on Day 3, March 2010
So I actually ended up spending yesterday researching the history of The Battle of Brooklyn–also known as The Battle of Long Island–for a game Julio Terra and are working on for Come Out and Play.
The game would consist of two teams defending and conquering territory in the current landscape with reference to the landscape that existed at the time of battle.
Ideally, historically important destinations will be geotagged, and players can see where they are on period maps, relating it obviously to where they are in the contemporary city. The “Redcoats” will be given specific objectives to capture, while the “Revolutionaries” will be given defensive positions, and can send out expeditionary forces to prevent capture.
The capture and defend mechanism is at the moment envisioned with cameras. The Redcoats photograph predetermined locations and icons, and email them back to headquarters, while the Revolutionaries try to defend those positions by photographing the Redcoats first. The game may or may not end with a variant of Capture the Flag at Stone House, the likely game headquarters, and site of one of the final critical skirmishes of that battle.
Each team’s status along the way would be updated with reference to how the actual battle played out, so that players have the opportunity to learn about the historical events that occurred in the locations the game is taking place, and develop a deeper appreciation for Brooklyn’s past and relevance to early days of the Revolution.
The critical locations stretch from Gravesend Bay at the southern end of Red Hook, to the Cemetery of the Evergreens, and west to Brooklyn Heights, as can be seen from “Howe’s Map” of October 1776:

Credit: Brooklyn On Line
The point to the British seizing Brooklyn and New York was to wrest control of the Hudson River from the Americans and separate New England from the remainder of the Continental United States.
Critical locations and dates [Credit:Â Brooklyn On Line and NY Freedom]:
View The Battle of Brooklyn in a larger map
Add comment | March 16th, 2010
What’s the Difference?
By Mike Cohen on Day 3, March 2010
In my continuing effort to do things at 4-in-4 that I’ve never done before, for Day 3, I wanted to do a video project. I wanted to come up with one question to ask people on the floor. I started out thinking something abstract would work, like “where are you going?”, but I decided in the end that simple always wins. I asked people, “what’s the difference between you now and before you came to ITP?”

Thanks to everyone in the video for volunteering your time.
Add comment | March 16th, 2010
s-video cleaned up
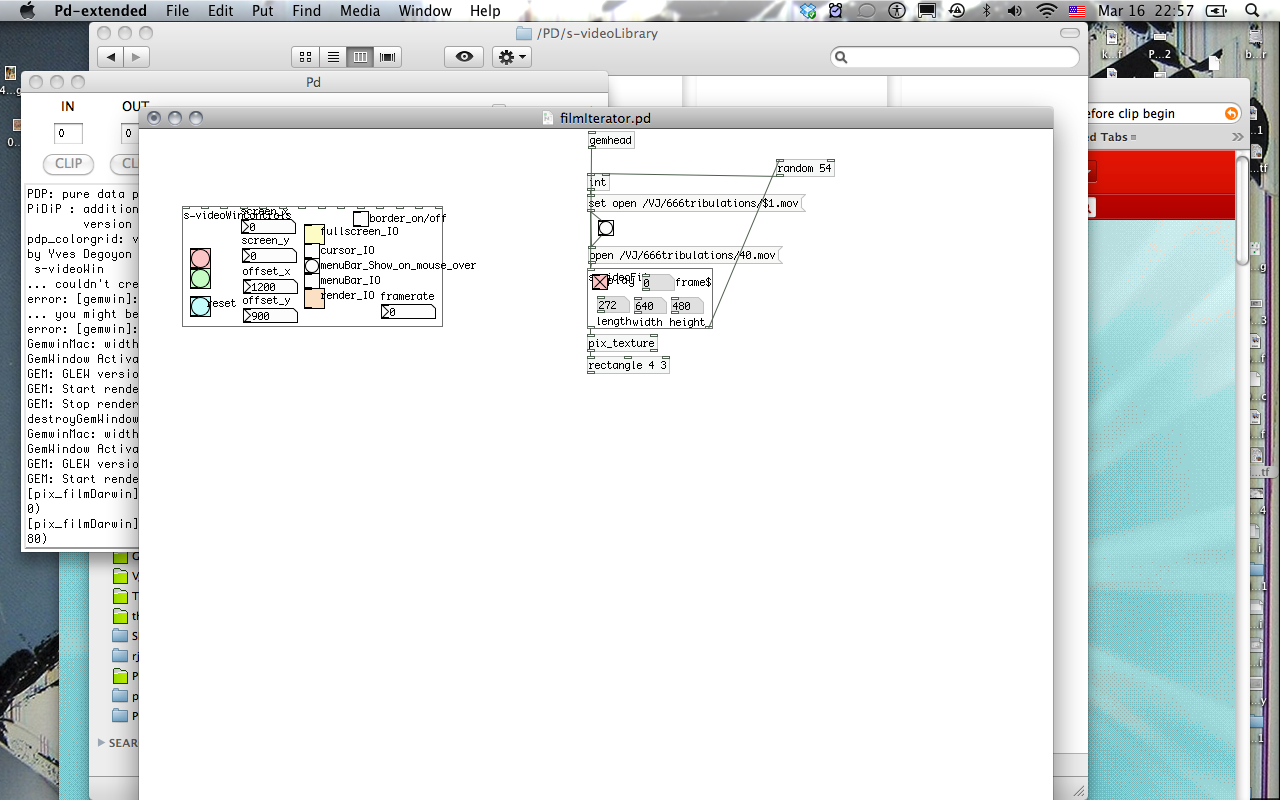
By yuditskaya on Day 2, March 2010
I cleaned up my dataflow midterm, a series of abstractions, mostly gem wrappers for pd.
Cut and paste your way to open-source VJ goodness.
See a short documentary video here
And email me if something isn’t working please please please here: yud dot sofy at gmail dot com
Add comment | March 16th, 2010
An He Built A Crooked House: A probabilistic 8-bit composition
By Greg Borenstein on Day 2, March 2010
Yesterday, for the day 2, I made a semi-randomly generated 8-bit song.
Way back during orientation week, a few of us were talking about music, as you do when you’re just getting to know a new group of people. Specifically, Marko Manriquez and I shared our enthusiasm for Aphex Twin. We talked about the incredible variation and detail that shows up in the drum programming in pieces such as Girl/Boy Song and wondered whether such intricately constructed music could possibly have just been made by hand or whether some kind of algorithm helped out.
I speculated that you could accomplish something like that style of non-repeating linear invention by using probability. You would just declare a set of allowed pitches and metric values to be assigned to each instrument and then allow the computer to randomly choose between those over-and-over to compose the piece. That would allow you to shape the aesthetics of the output without having to go in and make all the tiny micro decisions required to through-compose something with as much mind-boggling detail as the drums in Girl/Boy Song. (For the record, I don’t believe that this is actually how Aphex Twin works; I think he actually writes all of that stuff by hand.)
Having had this idea, I sat down during the Tisch Convocation and wrote Whoops, a Ruby library that uses probability to generate scores for bloopsaphone, _why the lucky stiff’s 8-bit music generator. Bloopsaphone uses a very simple text-based score system where, for exaple, “4C” would mean “play a quarter note on C”, etc., which made it very easy to implement this idea in an environment where I could get instant feedback in the form of listenable music.
This was all back in late August of last year. I haven’t touched Whoops since.
So, yesterday, for 4-in-4 I decided to actually use Whoops to create a piece of music. I started by defining a bunch of bloopsaphone sounds: hi-hat, snare, bass drum, lead melody, and bass. Next, I started using Whoops to define what I wanted the drums to do.
If you look at lines 53-57 of that ruby script, you can see the Whoops commands that generated the drums. I’m always having them play C since they’re a percussive instrument anyway and their pitch doesn’t matter. For the bass drum and hi-hat, I mostly want quarter notes (this is Aphex-inspired IDM, after all) so I give “4″ as the most common value in the duration array. I want the snare to feel like it’s largely on the 2 and 4 so I mostly give it half notes in its duration array. And then, I added one more sequence for the hi-hat, “hat_detail”, that plays spastically on small duration increments (16,32, and even 18 and 9 for 16th and 8th note triplets). I gave that sequence mostly rests (the empty string) as its pitches so that it would only play occasionally; I wanted it to be decorative, not totally take over.
Once I had the drums starting to sound how I wanted, I figured out a chord progression for the melody and bass to follow and wrote down sets of notes that they should be playing for each chord. Then, I followed the bloopsaphone API to play the resulting music and also made sure that my script would spit out the actual notes generated for each instrument. That way, each time I ran the script, I’d get a different musical result and if I liked one, I could copy and paste the score for it so I could reproduce it and even modify and improve it if I wanted to.
After lots of runs, I had a few versions of things that I liked. The melody was the weakest. Some runs would have bits of compelling melody in the patterns that happened to come out but it was rare also not to have bits of weird dissonance or just melodic incoherence. So, I went in and edited the melodies I liked best to tweak them into a more compelling shape through classic melodic rules such as repeating patterns that were already there or adding sequence and series. The results sounded like this, for example: whoops_demo_2.mp3.
Here’s the score for that fragment:
Once I had a couple of bits that I liked, I outputted the instruments one at a time to AIFFs using Soundflower and GarageBand and then brought the resulting files into Logic to mix. I was surprised at how easy and fun it was to mix these 8-bit sounds. I wasn’t sure how well they’d take reverb, compression, and the other normal tools of music mixing, but I ended up pretty happy with the sounds that I got.
I didn’t have time to put together a long-scale composition, but I did finish a sketch for a song. I’m calling it “And He Built A Crooked House”. Listen to it here: And He Built A Crooked House.
Add comment | March 15th, 2010
Retro Arcade Museum: An Electromechanical Wonderland
By Greg Borenstein on Day 1, March 2010
Yesterday, for day 1, I organized a trip up to the Retro Arcade Museum in Beacon, NY. The museum is filled with arcade cabinets from the 60s and 70s, most of which are electromechanical rather than digital. Together they form a kind of encyclopedia of a lost age of engineering where a vast literature of interactive motion, optical, and sound effects were created using a narrow vocabulary of buttons, relays, cams, lights, and mirrors.
The museum’s proprietor, Fred Bobrow, is an enthusiastic guide to this literature, willing to talk endlessly about all the tricks the games’ designers pulled to achieve their effects. He even opened up a few of the cabinets so we could see how they worked, revealing an amazing universe of magician-caliber optical trickery and incredibly intricate hand-built analog electronic systems.
For this post, I’ll talk about a few of my favorite games and what I learned about how they worked (largely from Fred) and about the aesthetic qualities of their interactions (from playing them).
The first game I played on coming into the museum was Sega’s Gun Fight.
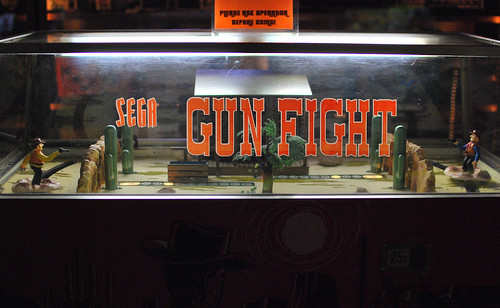
This is a table top format game enclosed in a glass terrine. As you can see, it pits two cowboys together in a pistol duel across an tumbleweed-strewn western town. Each cowboy is positioned behind some cover consisting of a rock wall and two cactuses.
Each player stands behind his cowboy, with his hand on a gun-shaped control, and tries to shoot his opponent when he’s visible through cover, without getting shot himself.
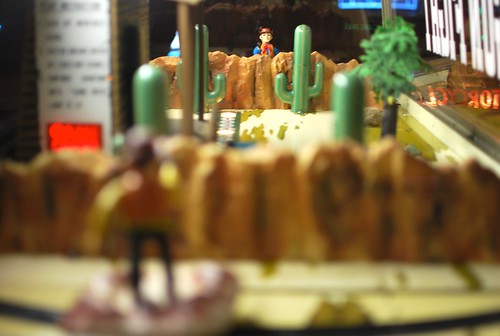
Players can move their cowboys from side to side along the slots beneath them. When you successfully hit another player, their cowboy collapses for a few seconds and your score is increased:
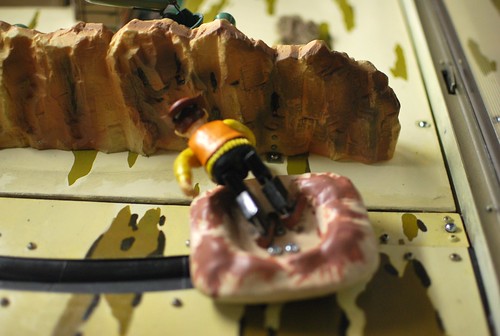
(If you shoot a cactus, it will fall over as well.)
Fred explained that beneath the surface of the machine is a series of lines of contacts. When both cowboys are lined up on the same contact line and one of them presses the trigger, that closes a circuit engaging the solenoid that adds slack to the rubber bands keeping the opposing cowboy standing up (so that the falls down) and causes the next bulb in the score display to light up.
Many games throughout the arcade used this technique of having a series of conductive lines on a circuit board closing a circuit between moving players and targets determine hit accuracy.
The next game I played was Chicago Coin’s Motorcycle:
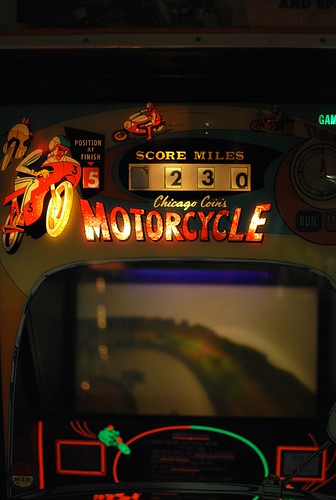
This game’s main attraction is its beautiful projected graphics. According to Fred, inside the cabinet are a series of three circular zoetrope style screens that spin at different rates to : one with the image for the background (produce the illusion of speed), one with the slower blue riders who appear on the inside of the track, and one with the faster yellow riders who appear on its outside.
These zoetropes all project their figures onto a translucent screen that’s parallel to the floor inside the cabinet at about the height of the player’s controls.
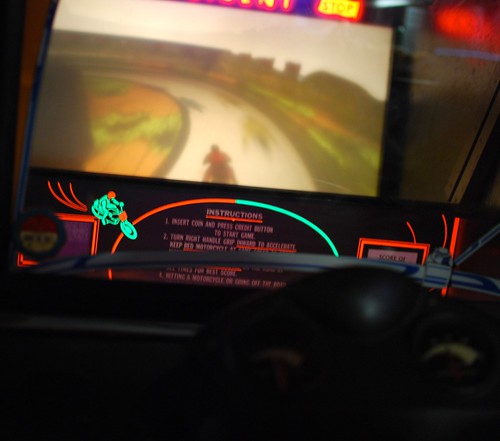
On top of that screen is another motorcycle figure, this one directly connected to the player’s handlebar interface so that it moves side-to-side as the player steers. The final shadowbox image is then reflected by a 45 degree mirror so it can be seen by the player.
The game has a series of electrical contacts connected to the moving player motorcycle and the rotating non-player motorcycles. If any of these touch, a circuit is triggered representing a crash, causing flashing red lights and all of the rotation to stop. Also, there’s another switch that detects each full revolution of the outer zoetrope which counts as the completion of a single lap. For each completed lap, the score counter on the top of the cabinet increases by one via a rotating number connected to a low RPM DC motor.
The player also has an acceleration control on his right handlebar. Turning that causes all of the zoetrope cylinders to spin faster.
The biggest problem with this game is that it is fiendishly difficult. Unless you barely touch the accelerator, the other motorcycles crash into you so quickly that you’re constantly stopped, making for frustrating intermittent gameplay.
The quality and sophistication of the sound used in the games varies wildly from mechanical bells to simple square wave beeping to, surprisingly, pre-recorded sounds.
A great example of the latter is Bally Space Flight:
If you listen carefully over the sound of other games and Hey Jude on the arcade stereo, you can here a series of radio transmission from mission control to the pilot of this lunar lander. These sounds are, amazingly, played via 8-track tapes which are kept in synch with the rest of the gameplay via high pitched noises outside the range of human hearing that are included on the tracks and which are picked up by simple microphones in the analog circuitry controlling the game. The tapes include these sounds every 18 seconds so that the circuitry controlling the downward movement of your space shuttle won’t wander out of phase with the voice of mission control.
Then, the sensors in the game which detect whether you’ve successfully gotten your shuttle’s glowing red landing pod into the hole in each crater, trigger different tapes to play based on whether mission control should be congratulating or haranguing you with “abort” warnings.
One very common technique in these games is the use of beam splitting one-way mirrors to superimpose figures on a scene and to enhance the illusion of depth in the space portrayed inside the relatively small cabinets.
A great example of using mirrors to superimpose moving figures on a static background is Commando:
While it looks like this seascape diorama is located directly in front of you while you’re playing the game, it is, in fact, hidden in a compartment in the body of the cabinet and rotated 90 degrees to the vertical. You see it reflected in a one-way mirror placed at a 45 degree angle in front of you. This setup allows the scene to have more depth than would be possible in the standard 20 inch deep cabinet.
The flying helicopters moving across this landscape are located in the compartment of the cabinet directly in front of the player. They’re lit with black light so that they’ll shine through the one-way mirror without making anything else back there visible.
Part of the purpose of this surprising, but apparently quite common design was to keep cabinets at a size that would allow them to fit through standard doorways while still providing players with a game world that had more than 20 or so inches of depth. Since the games needed to be head and shoulder height anyway, why not take advantage of the optical path created by the long cabinet to enhance the illusion of depth.
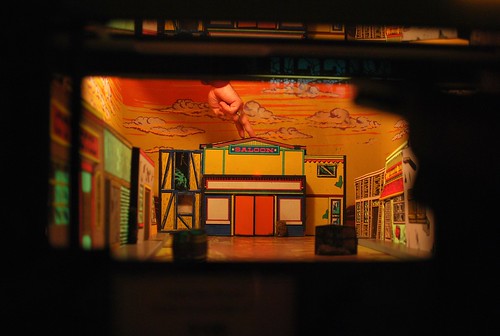
Fred explained this principle to us by showing us the insides of Shoot Out, another Western-themed game that takes advantage of this optical path trick to portray a long and dusty western street.
Fred unlocked the bottom of the cabinet and opened the door to show us the saloon at the end of the street upside down in the bottom of the cabinet, facing up towards the one-way mirror.
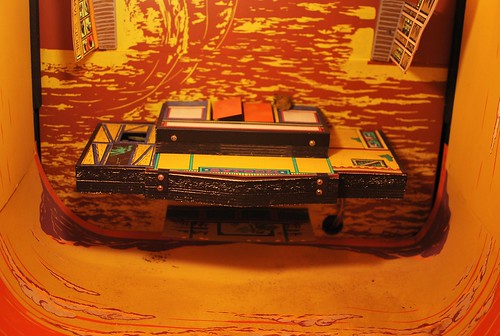
He then had us look into the main area of the screen while he stuck his hand into the bottom diorama — lo and behold, his fingers descended from the sky of the western street to dance along the top of the saloon!
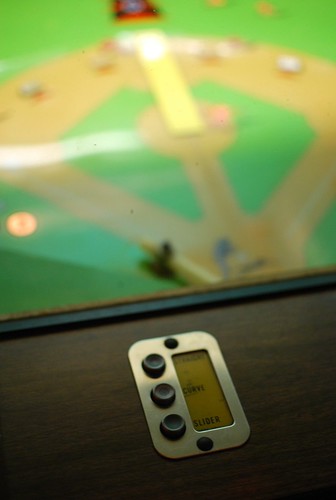
One of the highlights of the trip for me was when Fred opened up the bottom of Chicago Coin’s World Series baseball game to show me the nest of relays, wires, discs, and other mechanisms that make the game go. First, so you can appreciate what’s being achieved, here’s a picture of the game itself:
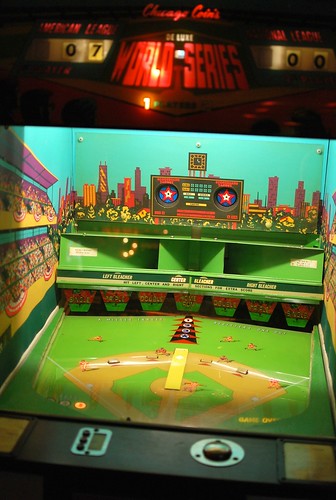
Now, take a look inside:
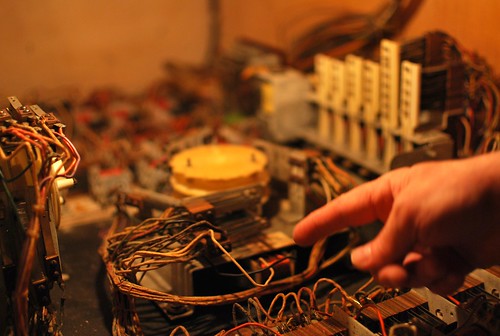
Here, Fred is pointing out the relay that chooses which type of pitch will be thrown: slider, fastball, or curve. Its settings are controlled by this interface on the top of the game:
The bank of relays and switches on the right of that picture above gets used in resetting the entire state of the game including the number of pitches available to the player and the score.
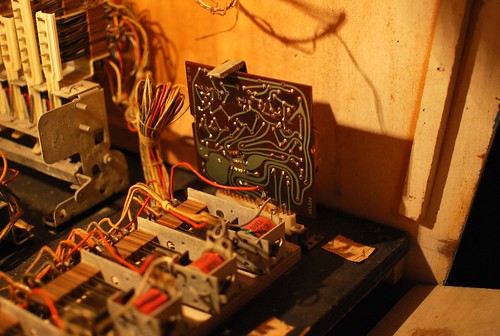
Here’s a picture of the amazing, early circuit board that serves as the brains of the operation:
Overall, it was an amazing trip and I can’t wait to schedule an appointment to go back and have Fred show me all of the workings of the various games.
The incredible beauty and diversity of the visual and other effects these games with such simple mechanical and electrical systems is deeply inspiring and the actual details of the tricks they use could be a great reference for aspiring physical computing interface designers.
I put a ton more photos and videos in my Retro Arcade Museum set on Flickr. So take a look there if you want to see more. And if you get a chance to drop by the museum, don’t miss it. It’s a truly amazing place.
Add comment | March 15th, 2010

