Do a creative project every day for four straight days.
Projects must be completed in a day, so they need to be as compact as they are creative
Each project needs a name and documentation posted by the end of the day. Each should be a stand-alone accomplishment
name that molecule
By Kristin O'Friel on August 2008, Day 2
i made a tote bag out of waterproof canvas that consists of a conveniently located periodic table printed on one side, and a game called ‘name that molecule’ on the other.
process:
i sketched out a quick pattern in rhino and exported to AI to lasercut a prototype in butcher paper
once the pattern was validated i selected a handful of molecular images and found a beautiful periodic table to use
the AI pattern was then imported into Pshop for layout
and printed on waterproof canvas


the material was then doubled over and cut out.
the doubled canvas was a little cumbersome to sew, but it provided stability and functioned perfectly as interior lining to the bag.
more 5-in-5 photos on flick
2 comments | July 30th, 2008
Free.P.S. (Freedom from Positioning Systems)
By Christian Cerrito on August 2008, Day 1
It seems not all that long ago that most of us had little idea about our exact locations on the planet the majority of our days. Many of us who used to be content wandering city streets, now instead poke away at our IPhones for constant direction and advice. It is nearly impossible to navigate an automobile any more without an automated voice correcting your every move, dryly informing you just how much time you’ve wasted by taking a wrong turn, or, god forbid, making an unscheduled pit stop.
It all seems a bit silly sometimes, doesn’t it?
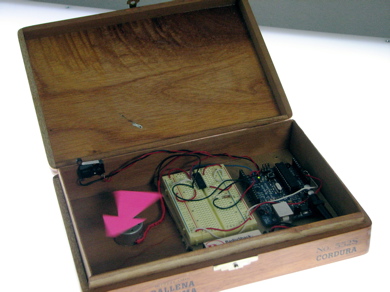
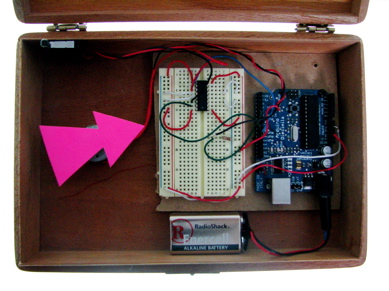
For my first 5-in-5 project, I decided to start working on a project I’ve had kicking around in the back of my head for sometime; A completely random, spin the bottle, form of guidance system that will never, ever, get you to your destination on time, or even on purpose. The Free.P.S. System is quite simple, consisting of an Arduino, an H-bridge, a switch, and an arrow attached to a small motor. When the user opens the cigar box, the arrow is triggered to spin at various speeds, changing direction every now and then. After a random amount of time, the arrow stops, and the user heads in the general direction that the unit suggests. When the user hits a dead end, or decides that they need to reconsider where they’re heading, they simply open the box and repeat the process.
Take a look at the Free.P.S. Unit in action below. This is a rough prototype, and it isn’t working exactly as I had planned, but you get the idea. I would really like to make this pocket/keychain sized, or incorporate an actual compass of sorts in the future.
3 comments | July 29th, 2008
pinwheel
By Kristin O'Friel on August 2008, Day 1
pinwheel was designed to eliminate the languor and indecision that occurs when you eat in a four block radius everyday.
restaurant list: mamoun’s, temple, cafetasia, pizza mercado, san loco, chipotle, red bamboo, little atlas, sunrise mart, rick shaw
parts modeled in rhino and exported as AI files to be lasercut
plywood pieces: 2 x interior wall, 20 x slice, 10 x side (all 1/8″)
acrylic pieces: 1 x white (1/8″), 1 x clear (1/2″), center pin
lasercut and etched slices ready to be assembled
reinforced back wall || paper secured || plastic post
spinning mechanism from the junk shelf || center piece || pinwheel face complete
here is a short video of the pinwheel spinning – now i just need a place to mount it.
more 5-in-5 photos on flickr
2 comments | July 29th, 2008
TuneSash – a wearable audio player speaker system
By Corey Menscher on August 2008, Day 1
The TuneSash is complete! Unfortunately, I spent over six hours attempting to hack the iHome iH85, but in the end it just did not work. Instead, I created an audio amplifier out of an LM386 chip, and I have to say…it sounds awesome!
Most of my day was spent taking apart the iH85 and resoldering the iPod dock’s ribbon cable, as well as a couple of solder points that came apart from handling the dismantled unit. Here’s what the iH85 looks like when taken apart:
1 comment | July 29th, 2008
T-shirt
By Christian Bovine on August 2008, Day 1
day 1 – make t-shirt design / learn to use a sewing machine
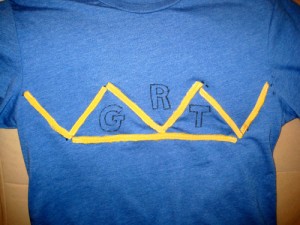
I decided to do a t-shirt design / learn to use a sewing machine on Day 1. Here are the materials I used:
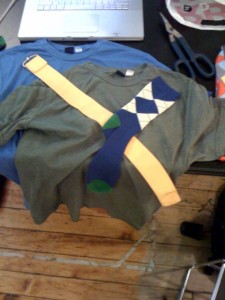
The material I used for the front was a nylon belt which was quite difficult to work with. I cut long strips and sewed them on but the strips would fray on the edges. So i had to burn the edges to melt the nylon in order to keep them from fraying. The strips were also a bit difficult to sew using the sewing machine, but it is definitely easier than doing it by hand.
I then came up with an idea to have a sock sewed to the back of the shirt which appears as though it is stuck there because of static. This as we all know can happen coming out of the dryer. I thought it would be funny if it was sewed on for people to think you left the house and this sock has stayed stuck to you all day. So that’s what I did:
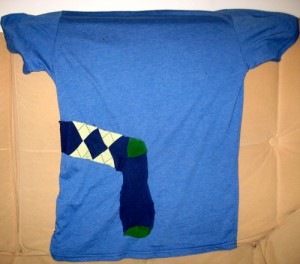
The day was reasonably productive. I like the sock on the back more than the front of the shirt. I might just make a few shirts with random things stuck to the back in a similar fashion. I think its funny!
1 comment | July 29th, 2008
Mating Drawings.
By Vikram Tank on August 2008, Day 1
My project for 5-in-5 today was a system of software organisms that create drawings through behaviors. In the early spring I went to go see Casey Reas speak about his work. He referenced Sol LeWitt’s instruction based art works as a source for his work. LeWitt would send parameters and instructions to galleries to create the art work themselves.
1 comment | July 29th, 2008
Mega Man Linocut Prints
By Adam Parrish on August 2008, Day 1
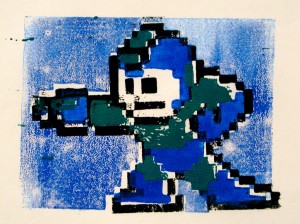
My day 1 project was about an analogy between retro video games and printmaking.
The Nintendo Entertainment System has a limited palette: of fifty-odd possible colors, only twenty-five can appear at any one time, and only four of those can be used in a single sprite. Games produced for the NES made careful use of this palette, expressing as much information through color as possible. This is famously the case in the Mega Man games for the NES, in which Mega Man (our hero) changes colors to indicate which weapon he’s using.
6 comments | July 29th, 2008
Claw Machine
By Tim Szetela on August 2008, Day 1
I visited Japan two years ago and collected a lot of stuff. At an arcade in Hiroshima, I played a claw machine over and over again, winning many small toys (pictured below). I had wanted to do some sort of project with them for a while. The toys are overly cute, and the game was overly addictive. A page of animated gifs seemed to be the appropriate combination of these two characteristics. I had also recorded audio on the trip to Japan, including the music that played in the arcade with the claw machine. I used this music and animated the toys to create my Monday project. Click on the link below to visit it (Firefox works best).

1 comment | July 29th, 2008
“Welcome Robot, 1.5″
By Armanda Lewis on August 2008, Day 1
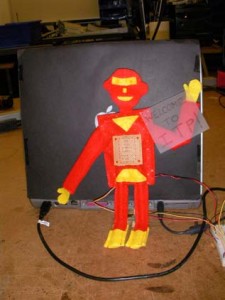
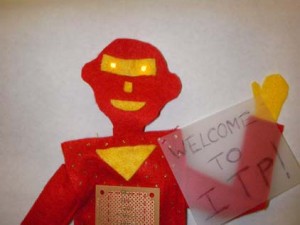
He’s new and improved, and now with Ironman colors! It’s ‘The Welcome Robot, 1.5′!
On Day#1 of 5-in- 5, I made the ‘Welcome Robot, 1.5′ which greets ITPers with a friendly wave at times when Matt is not at the front desk. This is the latest version of the “Welcome Robot” which I started this summer in the “Sociable Objects” class (click here for more on the 1st version).
Here is the ‘Welcome Robot, 1.5′ when Matt is at his desk.
It is motionless and the led lights are off. When Matt leaves, he can press a simple switch which then turns on the led lights, indicating that the robot is in sensing mode.
This version featured Ironman colors (red and gold) and a feather servo which makes the robot wave. The wave is triggered by a specific input from a long range sonic ranger, indicating a passerby. Upon sensing a certain value from a range sensor, the robot’s arm waves to greet the passersby. As you will observe in the video, I definitely have to do something about his soldier-like wave and make it more toned down. Since I only had a day for this version, however, I am going eventually add a sound greeting which will accompany the waving arm, and an xbee component which will sense when the elevator doors open. This way, I can better predict if the range sensor is sensing someone arriving or departing, and only have output for people arriving.
Here is a short video of the ‘Welcome Robot, 1.5′ in action: http://www.vimeo.com/1426246
I would recommend a 5-in-5 type of project for anyone who wants a creative challenge. Knowing that you have only one day to complete a project and document it is daunting, but then when you finish you have a sense of accomplishment that you did so much under serious time constraints. Until tomorrow…
3 comments | July 29th, 2008
ZenTV
By David Steele Overholt on August 2008, Day 1
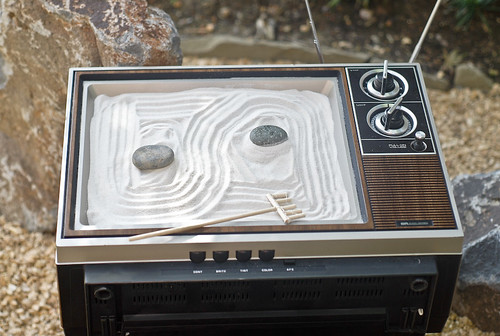
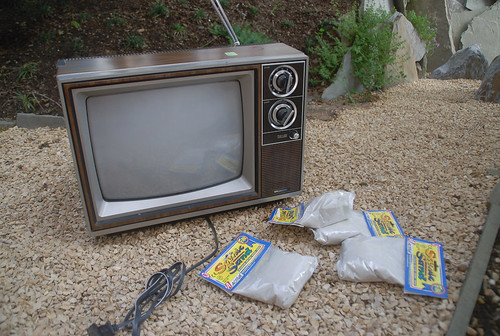
I made a trip to the local thrift store today for some inspiration and tools. I had in mind that I wanted to use a television (I considered taking out the tube and modding it into a bookshelf) and came upon this really cool, old TV (1984). Wanting to stick with my idea of re-engineering a television’s use both physically and mentally, I decided I would plant it in the middle of a rock garden nearby and turn it into a mini Zen garden.
Materials:
I cut the dowel rods and super glued them real quick to make the rake, dumped the sand out so it sits right on top of the glass, plugged in the TV to a nearby outlet, and hid the cord under the rocks below the TV. I really like how the light from the TV shows through, so I didn’t try to hide it. Admittedly it calmed me down after getting everything ready on the 5-in-5 website this morning.
2 comments | July 29th, 2008
RootPoops 1.0
By Andrea Dulko on August 2008, Day 1
Hi!
So Stella Kim and I had talked about working on this as a midterm during the upcoming semester. Just this morning, I figured why not try it today.
RootPoops gives you all the encouragement you’ll need while using the toilet. We could all use someone cheering us on!
In one day, I aimed to get a number set up where caring people could cheer on their fellow bathroom users. Those words would then be posted to a site (eventually rootpoops.com) where the person in need can go and find that extra little push!
It’s 7:13. I’ve done a ton of looking at Asterisk today (for the first time!). Here’s what we’ve got:
1. 212-796-0729 x181
2. Leave your message
3. Check out andreadulko.com/rootpoops
4. YAY!
OK, OK… maybe not yay. There’s a small issue. Asterisk is sending email with each voicemail attached. The attachments are failing to post to the site when they come from the Asterisk email. What does that mean? Well, If I forward the email, it works. hmmmm. I’ll report back later. But feel free to leave a message now!
Add comment | July 29th, 2008
EcoFabulous Wallet
By Robert C. Moon on August 2008, Day 1
So my partner, Stella who I planned to work together for the first project but had the horrible misfortune of losing her precious laptop (not her fault), so she had to drop out, which left me with a free day to come up with something new. I’ve struggled all Sunday night, trying to plan something with no luck at all. I’m not much of a planner anyways, so I place most of faith on my commute to ITP to be inspired by an idea.
A few days ago, my father recently gave me a new tri-fold leather wallet, to replace my previous wallet taht was falling apart. The main reason of it’s demise was the fact that the wallet was leather and after years of abuse, like jumping in the ocean with my wallet in my pocket (by accident), the material just gave out at the seams. The wallet my father gave me was also leather, smaller and a bit thicker than what I am used to, so for today’s project, I will be designing and constructing a thinner waterproof bi-fold wallet.
I thought it was appropriate to have Bre Pettis as our guest today, since I was inspired by his earlier podcast of using plastic bags in layers as materials to build a messenger bag. His podcast can be viewed here. I will use a similar method of using plastic bags so my wallet will be waterproof. I did some research online for possible design ideas, but ended up deciding for a clean four pocket wallet.
So here are the steps to create my EcoFabulous Wallet.
Step 1: Gathering Materials
Here are the tools and materials I used to make my wallet. An iron, scissors, plastic bags and wax papers. The tools that are not shown above are an exacto blade, cutting board and ruler (or any straight edge to cut straight lines.)
Step 2: Prepare Materials
I cut the bottom of the plastic bags and then folded the bags in half (there should be 4 layers of plastic). I placed the folded plastic bag between two sheets of wax paper and ironed the top of the wax paper on a low heat setting. There is no need to press down hard, the plastic will form a strong plastic sheet. Warning: melting plastic releases some fumes, so be sure to iron in a well ventilated area.
Melting the plastic bags between wax paper created a nice texture. Be sure to use different color plastic bags to increase the cool factor.
Step 3: Cutting the plastic sheets in 1 inch stripes
I used a cutting board, a straight edge and an exacto blade to cut 1 inch strips to be used in the pattern. Be sure that one of your colors are cut long-wise (the length of your wallet opened). I learned the hard way, but I would advise weaving the strips on top of wax paper because it is difficult to move onto the wax paper and all your hard work of tighening the week would go down the drain.
Step 4: Weave the strips of color plastic to form a cool checker pattern. Be sure to tighten the strips together so there are no gaps.
Step 5: Place the woven strips between two sheets of wax paper so that it becomes one solid woven sheet. Be careful not to over heat it or the wax paper will stick to the plastic. It’s a pain to get out. Sometime you’ll see that not all strips are melted together so just put back the wax paper and iron it again. Be sure to iron both sides too because the iron will not be hot enough to melt the bottom layers. It should look something like the photo below. I personally like the wrinkled texture. Kind of looks like leather.
Step 6: Cut the excess rough edges
Use the exacto blade and ruler to trim the woven sheet into the dimension of the wallet. Remember to leave room to fold the bottom of the wallet. I roughly measure my wallet 10 inch wide unfolded (5 inch wide folded). This is enough for 4 pockets for credit cards.
Step 7: Sewing the pockets and edges
I cut a piece of black plastic the size of the width/height of the wallet. I folded the top lip to form a hem which makes it easy to pull out inserted cards. Careful measure out 4 equal pockets so that the same size credit card can fit in all the pockets. I also added a small skinny strip of black to tighten up the edges of the wallet.
Step 8: Populate the wallet with money (preferably Euros)
If all went according to plan you should have money in the sleeves and credit cards in the pockets. I actually made the dimensions of the wallet big enough to populate it with Euro bills as well.
I had tons of fun designing/making this wallet. It took me a total of 3 hours from start to finish and cost nothing to make (I had access to a lot of the tools but they are pretty common to find among friends). If I was to build this again with the knowledge I have now, I would definitely make more room between the two middle pockets so the wallet can naturally shut on it’s own. I would also try to add a clear pocket on the outside for a visible ID so I wouldn’t have to pull out my ID to get in and out of school.
3 comments | July 29th, 2008
Summer Mittens
By Joshua Berry on August 2008, Day 1
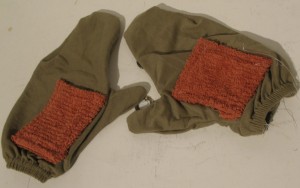
Well, since labor day is right around the corner, and leaves will start falling soon after, Day 1′s project had to be Summer Mittens. I’m simply running out of time to wear them. Besides the ability to keep you cool, these mittens will satisfy to the OCD patient in you. I used a breathable jersey cotton fitted sheet, facecloth, and a small freezer pack the size of a serving of soy sauce. Here is a picture of both of them:
A pouch lining the wrist contains the freezer pack. It helps to cool the body on those steamy summer days:
To make your own pattern, just trace your hand. Then make some summer mittens!
2 comments | July 29th, 2008
TuneSash Pre-flight
By Corey Menscher on August 2008, Day 1
Today I will be making the TuneSash. It’s a sash that contains an audio ampllifier, a speaker, an input jack, and possibly some sort of pocket for holding an audio player.
My initial intention was to make the TuneSash as generic as possible…meaning any audio player can be used. But since this is a one-off project, I figured I should make it with one particular audio player I own…an iPhone 3G. This means that I will attempt to incorporate iphone-specific controls as well as a holder for the unit itself. My backup plan is to just assume that an iPod Shuffle will be used in conjunction with the TuneSash. Since the iPod Shuffle has a built-in clip, it could prove to be the easiest player to work with.
In terms of electronics, there are two possible directions I can go with the TuneSash:
- Build an audio amp out of an LM386 chip and perfboard. I would use a 9V battery as the power source. This method has several drawbacks:
- Requires soldering a circuit to a perfboard
- Produces pretty awful quality audio
- Will chew through 9V batteries.
- Hack an existing iPod speaker device and incorporate the components into the TuneSash. I have an iHome iH85 speaker system for bikes and ipods (http://www.ihomeaudio.com/products.asp?product_id=10186). It’s very nice, but is difficult to hear from the position it’s to be installed on a bike, and also doesn’t hold an iPhone. So, I can take it apart and use the components in TuneSash. There are a couple of drawbacks to this as well:
- Destroy an expensive piece of electronics
- Does not have a 2mm audio jack, so it will be limited to iPhones/iPods with dock connectors..thus forcing me to create a pocket for storing the iPhone on the tunesash (and forget about the ipod shuffle).
- Takes four AA batteries, and requires the iPhone to also be held within the TuneSash, which means it will be heavier.
I’ve decided to go with the second option, if possible. The audio quality from the speaker is phenomenal, and its four AA batteries seem to last quite a long time. It also has a wireless remote, which will make it very nice when used in conjunction with a bike.
I’m going to start by dismantling the iHome device to determine how usable it is. If the parts separate cleanly, and are small enough, I’ll definitely proceed. Wish me luck!
Add comment | July 28th, 2008
Luis and Vitto
By John Dimatos on August 2008, Day 1
For my first day, I’m putting together a story, as told by my friends over voicemail. Last week, I asked two of my closest friends, Luis and Vitto to do something simple for me: call and leave voicemails about each other on my phone. I’ve wanted to do a narrative story using voicemails for a long time, because the lo fi fuzzy sound of voice over the limited frequency range of 300 to 3400 Hz on POTS is something I associate with great stories from friends waiting for me on my voicemail.The second premise of the day, and my general theme for the week, is how to make creative projects at work by picking a project and using resources you can split up into 5 minute stretches of action.
1 comment | July 28th, 2008
